 We are sharing information for knowledge. Presented by. SocialDiary.Net
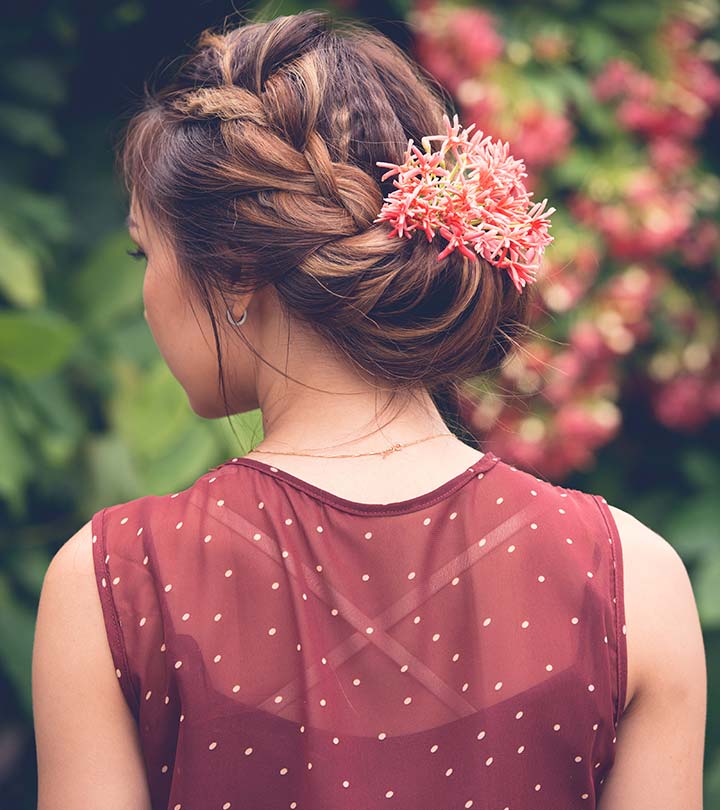
I’m in a rush, and my hair is a mess! There have been days where after 8 hours of work, I’ve had to rush for an informal event without any time to change my hairdo. A simple top knot or a braided bun has always been my saving grace in those times. I’ve zeroed in on a few updo hairstyles that can make your hair look gorgeous – whether it’s at college, an interview, or a party.
Updos are incredibly stylish. But how do you know you’ve picked the right one? Your choice of updo should be determined by your face shape.
How To Pick An Updo According To Your Face Shape
Round Face:
Try loose and voluminous updos as they will make your face appear slender. Updos with feathered front bangs and deep side-swept bangs will make your face look long. Tight high updos are a major no-no unless you add bangs.
Square Face:
A low updo will make your jawline appear slender and draws attention to your cheekbones. Stay away from high tight updos as they can make your forehead appear wider than it is.
Diamond Face:
A diamond face has sharp features that can sometimes be harsh. So, work with updos that make your face look soft. Allow a few loose strands to frame your face. Beware of buns that can make your jawline appear too sharp or thin. Opt for high or mid-range buns over loose low side buns.
Oval Face:
All updos look great on oval faces. If you want to accentuate your eyes, cheekbones, and forehead, pick a tight high/mid bun with feathered or tapered bangs. If you want to highlight your jawline, choose a low bun.
Heart-Shaped Face:
Try updos with bangs, preferably side-swept bangs. They cover the width of your forehead, making it look smaller than it is.
Inverted Triangle Face:
Updos with bangs will work wonders for this face shape. The bangs will help cover the forehead, but not entirely.
Triangle Face:
Low wavy side buns that masquerade as long bobs look stunning on a triangle face. This will make the jawline appear slender and widen the forehead and cheekbones.
Long Face:
Try mid-level and low buns. A high bun will make your face appear too elongated. A voluminous middle updo without bangs will look incredible as it will highlight your cheekbones and forehead.
Large Forehead:
If you have a high forehead, any updo with bangs will work well in covering the full width of your forehead. Bangs that graze your eyebrows and taper along as they reach the sides of your face will look great.
Short Forehead:
If you have a short forehead, consider high buns as they will add height to your face. Try sloped fringes with your updos as they will make your forehead appear larger than it is.
Now that you know which updos will flatter your facial features, here are 20 stunning updos that you can try out.
20 Stunning And Quick Updo Hairstyles For Ladies
1. The Twist And Wrap

What You Need
- Hair pins
- Spin pins
- Elastic bands
- Comb
Procedure
- Divide your hair into three sections – two side sections and one center section. Tie the center section in a ponytail.
- Wrap the center ponytail into a bun and use a spin clip to secure it in place.
- Take one of the side sections and divide it into two halves.
- Twirl the back half and wrap it above the bun.
- Twirl the front half and wrap it below the bun. Secure the wrapped parts with hair pins.
- Repeat the same steps with the other side section to finish off the look.
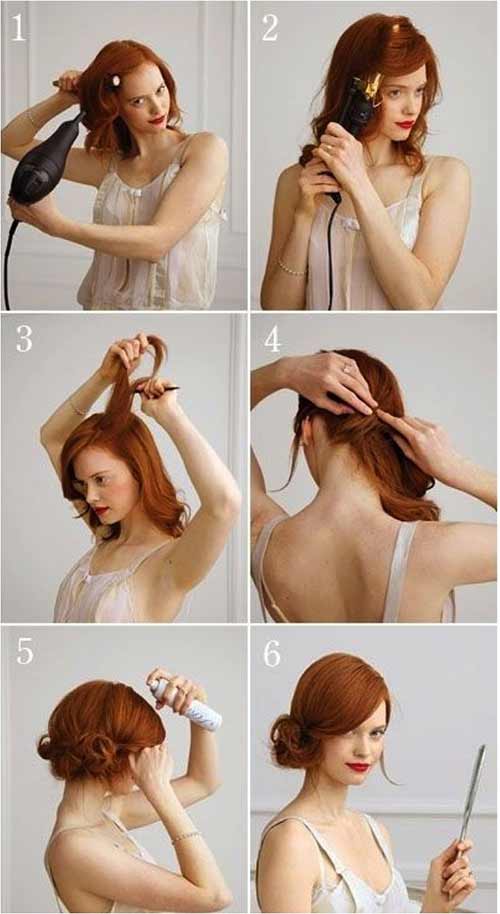
2. The Curly Mess
What You Need
- Hair dryer
- Round brush
- Hair pins
- Elastic bands
- Comb
- Curling iron
- Hairspray
Procedure
- Wash your hair and use a hairdryer and round brush to dry it.
- Using a curling iron, curl the lower half of your hair. Make sure you wait for five seconds before you remove your hair from the curler. Allow your curled hair to cool down before touching it.
- Part your hair on one side. Then, take some hair from the crown of your head and backcomb it. This will add some volume to your updo.
- Divide your hair into sections. Fold and wrap each section to the side of your head (below the ear) in such a way that only the curly or wavy ends are seen. To keep it in place, secure each section with a pin.
- Spritz on a good amount of hairspray over the updo to keep it in place.
3. The Braided Bun

What You Need
- Hair pins
- Elastic bands
- Comb
Procedure
- Divide your hair into two halves from the center to the nape of your neck with your hand.
- Braid each section and tie the braids with elastic bands.
- Take one braid and wrap it along the curve at the back of your head.
- Repeat the same with the other braid.
- Secure both the braids with hair pins.
- You can also decorate this updo with simple beads to add an elegant touch.
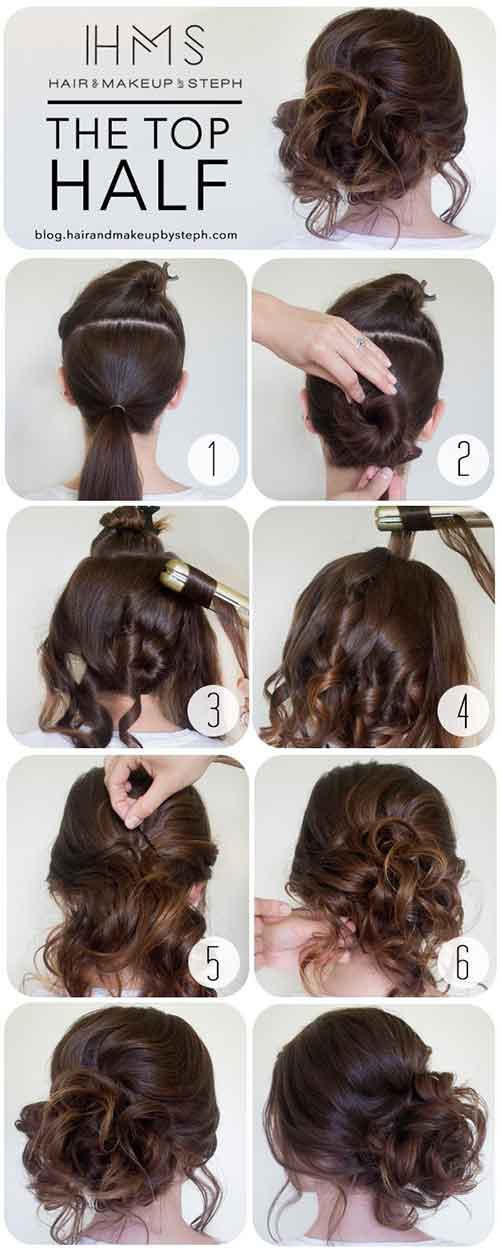
4. The Top Half Bun
What You Need
- Hair pins
- Elastic bands
- Comb
- Curling iron
Procedure
- Divide your hair into two halves. Keep the top part in one half, and the middle and lower parts in the lower half.
- Tie the lower half into a ponytail.
- Twirl this ponytail into a bun and use hair pins to secure it in place.
- Curl the top half of hair. Allow the curls to cool before you touch them.
- If you only want slight waves, keep your hair in the curler for about 3 seconds. If you want full curls, hold your hair in the curler for about 7-8 seconds.
- Take the sides of the top half and pin them up above and around the bun.
- Slowly start wrapping the curled sections of hair around the bun, leaving the ends to fall loose and cover it. Do this in such a way that the entire bun is covered and only the curly ends are seen. Keep the updo in place with pins.
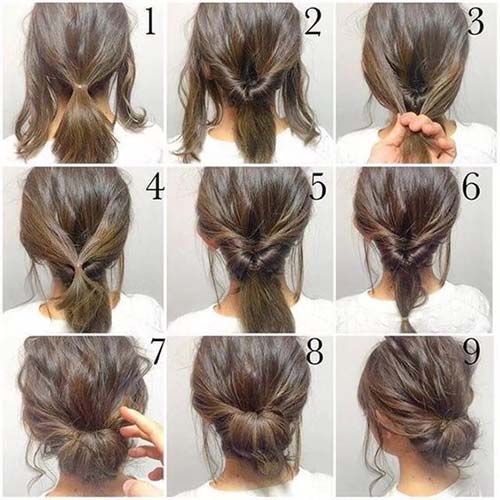
5. The Wrap Bun
What You Need
- Hair pins
- Elastic bands
- Comb
Procedure
- Part your hair on one side.
- Leave the front section out and tie the rest of your hair in a ponytail using an elastic band.
- Take one small section of hair from the ponytail and wrap it loosely around the elastic band. Pin the ends within the wrap with a hair pin.
- Repeat the same with the rest of the ponytail until you’ve reached the final bit of hair that comes out at the center.
- Take the remaining hair from the ponytail and wrap it around the base to form a bun. Pin it in place.
- Take the front section of hair, wrap it neatly around the base of the bun, and pin it in place.
6. The Faux Dutch Braid Mohawk

What You Need
- Hair pins
- Elastic bands
- Comb
Procedure
- Pick up all the hair from the front and divide it into three sections. Twirl the three sections and push them up a bit to create a pouf on the top of your head. Pin the pouf in place.
- Begin weaving the three sections into a Dutch braid.
- Braid the middle section over the side sections.
- Keep adding hair to the braid from the loose hair that is outside the braid.
- Once you have run out of hair to add to the Dutch braid, simply braid your hair till the end and tie it with an elastic band.
- Pancake the entire braid. To pancake the braid, slowly tug at parts of the braid to make it appear larger than it is.
- Take the end of the braid and fold it underneath it, pinning it in place. If you have long hair, you can fold the braid over itself and pin it in place.
- Pin your hair to the sides to keep the faux mohawk braid in place.
7. The 5-Minute Bun
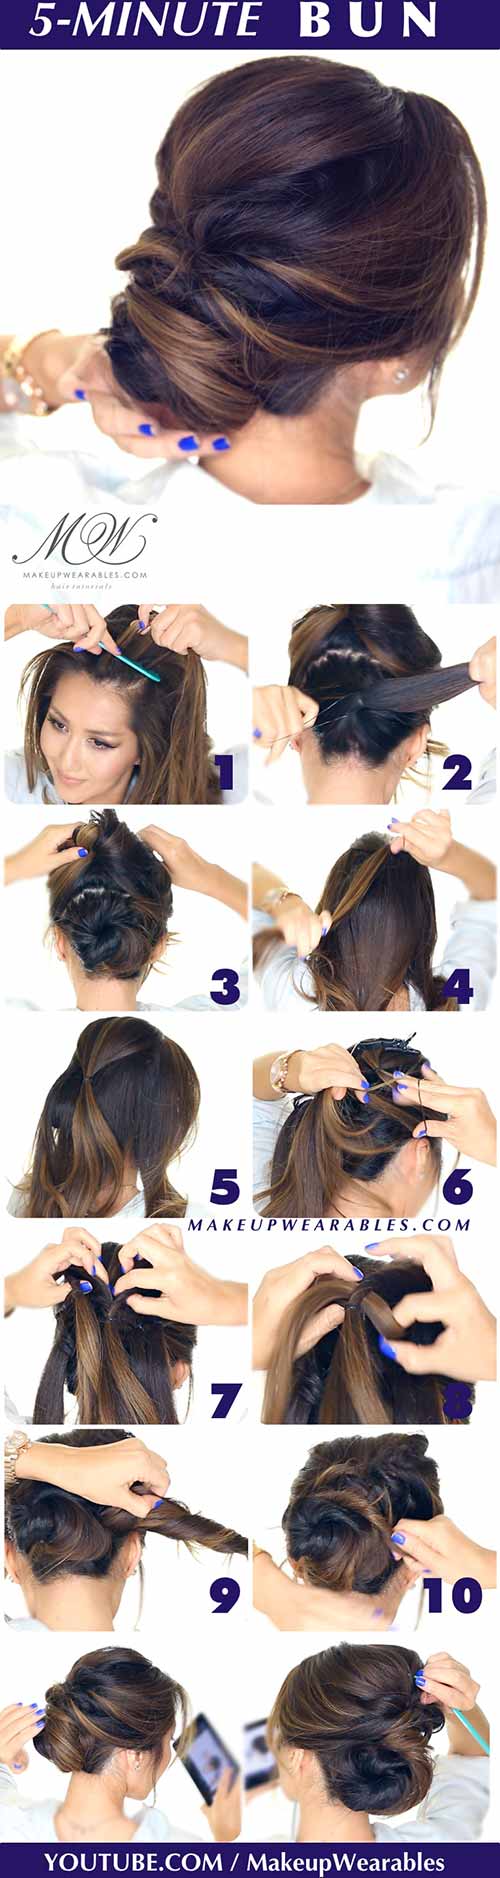
What Do You Need
- Hair pins
- Elastic bands
- Comb
Procedure
- Detangle your hair by combing it.
- Divide your hair into two halves – a top half and a bottom half. Clip away the top half.
- Tie the bottom half into a ponytail and then wrap it around itself to form a bun. Tuck the ends into the elastic band of the ponytail. You can also add pins to secure it.
- Unclip the top section of hair and divide it into five sections – two on each side, and one at the crown. Tie these sections into ponytails.
- Topsy-tail all the ponytails by flipping them through the section of hair above where they are tied. This will create a slight twist above the elastic band. Do this for all five ponytails.
- Pancake the flips as well.
- Now, take the middle ponytail and pull the elastic band a little low as the rest of the ponytails will need to pass through it.
- Pass all four ponytails through the section of hair above the middle ponytail. Leave only the ends to fall loose.
- Twist the loose ends, wrap them around the bun, and pin them in place.
- After this, carefully pancake the twists to soften the updo.
8. The Twist And Tuck
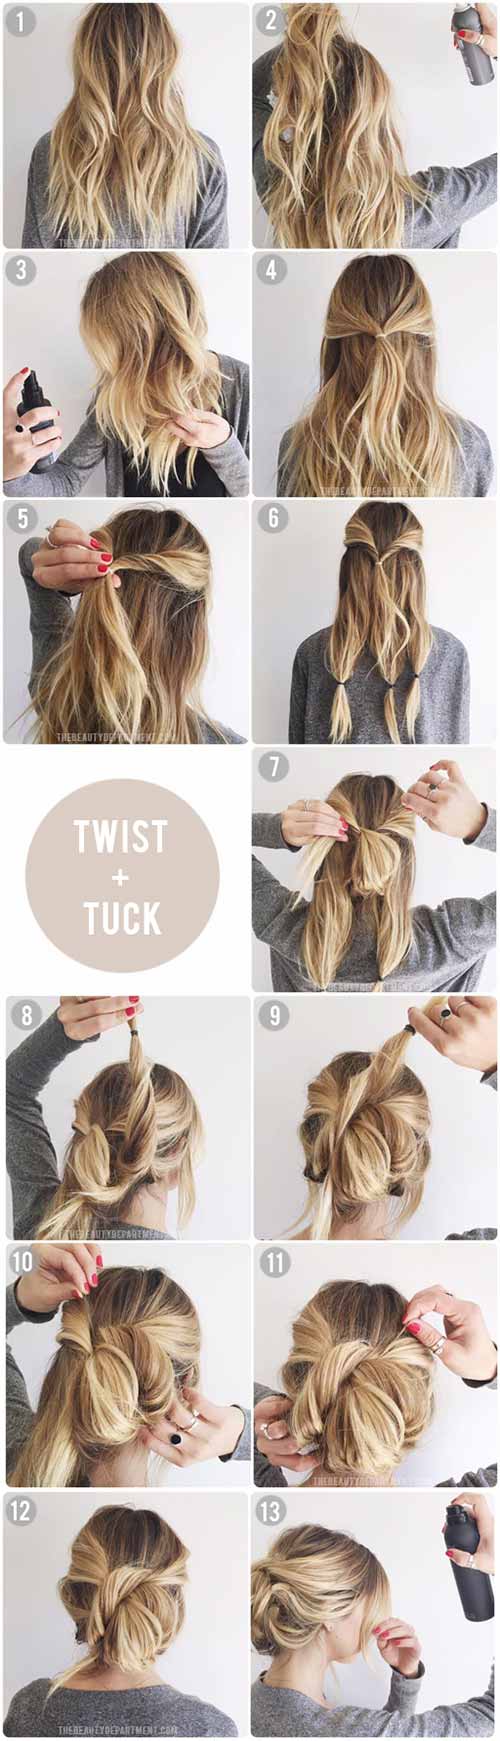
What You Need
- Hair pins
- Elastic bands
- Comb
- Hairspray
Procedure
- Comb your hair to detangle it.
- Spritz some hairspray all over your hair. Use it generously as it will help keep the updo intact.
- Spritz a good amount of volume spray as well. This will make your hair look lush and thick.
- Pick up some hair from both sides and tie it into a half ponytail.
- Flip the ponytail, i.e., pass the ponytail through the hair just above the elastic band. This will create a twist above the elastic band.
- Tie the rest of your hair (including the half ponytail) into three low ponytails.
- Now, take the middle ponytail and twist it and pass it through the half ponytail (the same way you flipped the half ponytail before). Don’t pull all the hair through. This will form a bun. Pin the ends within the bun.
- Repeat the same with the other two ponytails. Don’t forget to pin the ends within the bun.
- Apply hairspray again to hold the updo in place.
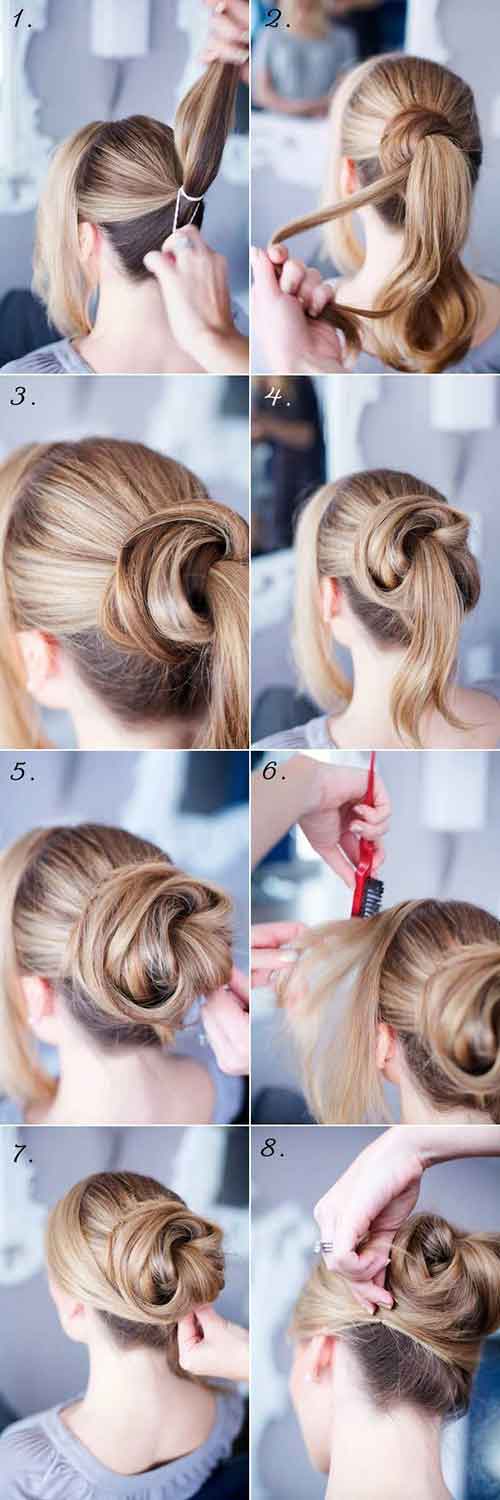
9. The Twisted Bun
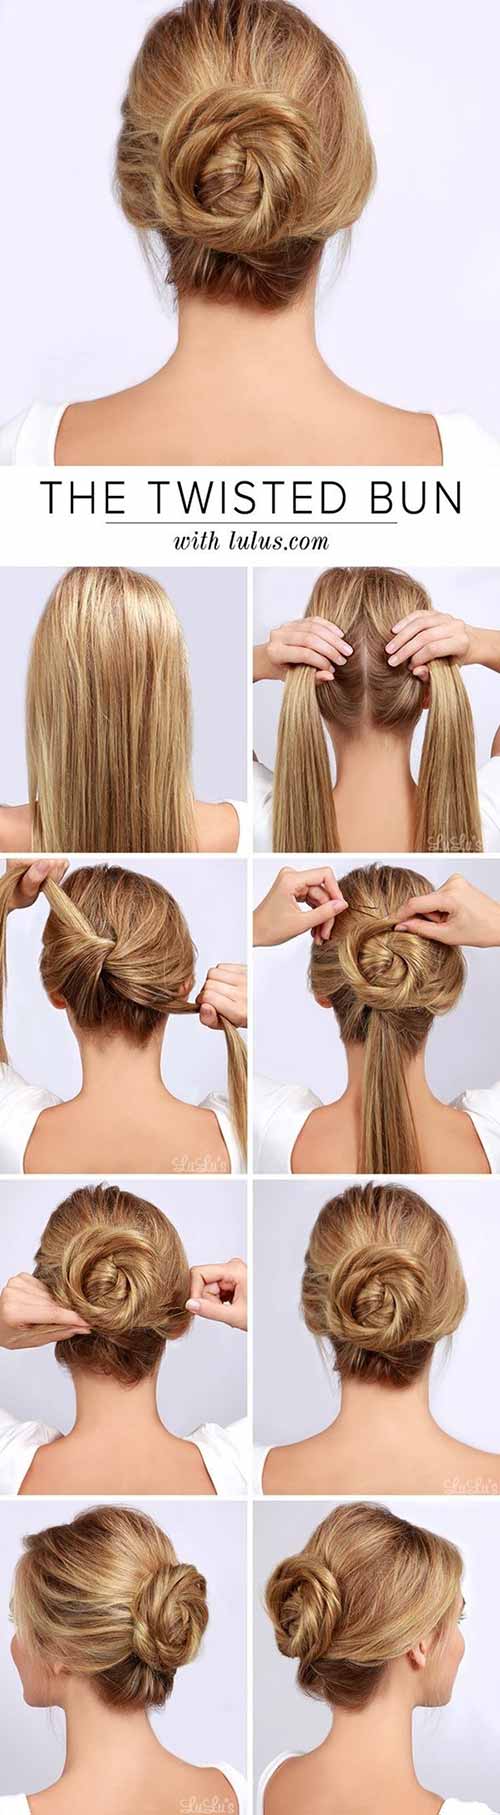
What You Need
- Hair pins
- Elastic bands
- Rat tail comb
Procedure
- Detangle your hair using a comb.
- Divide your hair vertically into two halves with a rat tail comb.
- Tie your hair in a knot, passing one side over the other and then through it.
- Then, twist and wrap one side of your hair over the knot. Make sure the twists and wraps are tight. Pin it in place.
- Repeat the same for the other section of hair.
- If you want to add height to your face, you can tease your hair at the crown and pin it up just before you divide your hair.
10. The Dutch Braid Bun
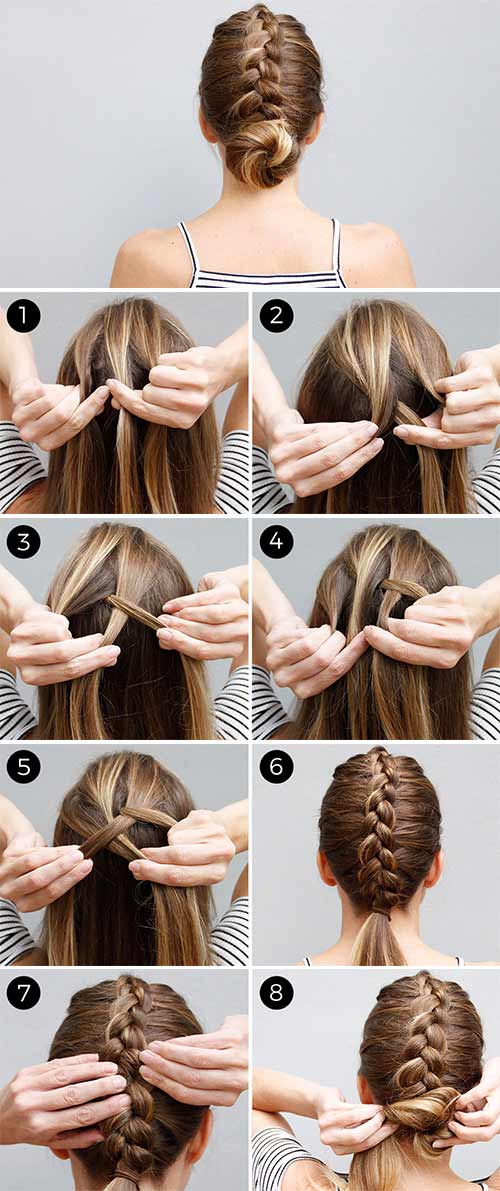
What You Need
- Hair pins
- Elastic bands
- Comb
Procedure
- Take a section of hair from the front and begin weaving it into a Dutch braid. A Dutch braid is like a French braid, but instead of the middle section going under the side sections, it goes over the side sections. This creates an inverse French braid look.
- As you weave, keeping adding hair to the sides of the braid.
- Stop weaving the braid once you reach the nape of your neck. Tie an elastic band around the braid to keep it in place.
- Pancake the braid neatly and carefully.
- Take the ends of your hair and wrap it neatly around itself to form a bun and pin it in place.
11. The Great Gatsby
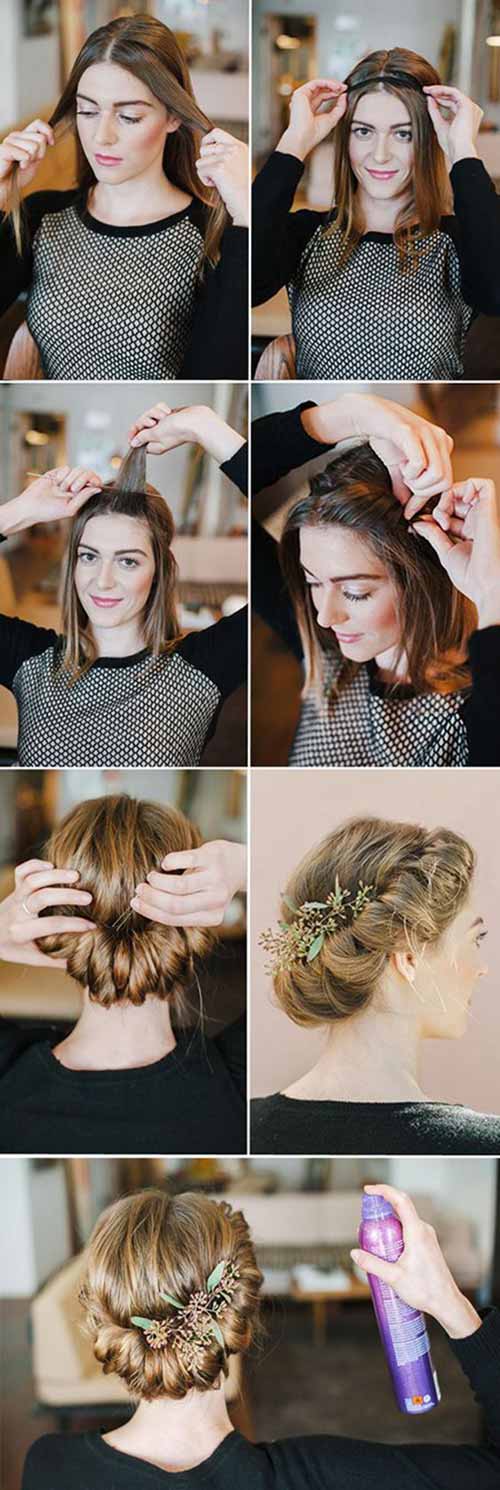
What You Need
- Hair pins
- Thin head band
- Elastic bands
- Comb
- Hairspray
Procedure:
- Detangle your hair and part it down the middle.
- Take a thin headband and neatly place it around your head.
- Tease the front section of your hair by backcombing it.
- Pass the front of your hair through the elastic band and pin the ends.
- Repeat the same for all sections of your hair, pinning all the ends in place underneath the elastic band.
- Accessorize your hair with simple flowers to add to the look. Apply hairspray to keep it in place.
12. The Messy Bun
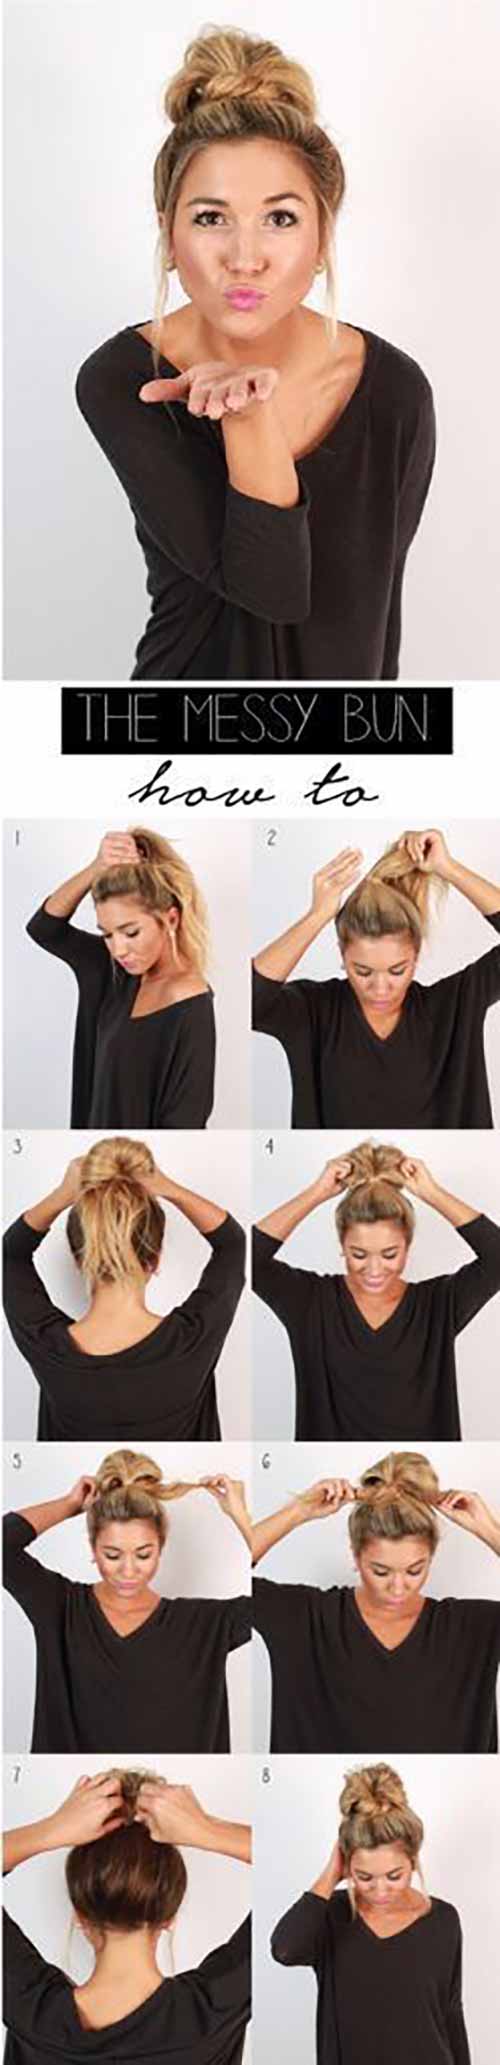
What You Need
- Hair pins
- Elastic bands
- Comb
- Hairspray
Procedure
- Detangle your hair and tie it in a ponytail.
- Don’t let the ends pass through completely at the last twist of the elastic band. This will create a bun, while the ends of your hair hang loosely from the ponytail.
- Take the ends and wrap them around the base of the bun and pin it in place.
- You can spray some hairspray on the updo to keep it intact.
13. The Wound Up Bun

What You Need
- Hair pins
- Elastic bands
- Comb
Procedure
- Detangle your hair and pick up the front section of hair, leaving the rest.
- Divide that section into three sections: two side sections and one middle section. Now, take one of the side sections and divide it into three. Begin weaving a braid on the other side. After a stitch (one weave of the braid), blend the middle part of hair with one side and take a new section of hair to make it the middle section.
- Keeping doing this all through the end of your hair. But while you weave the braid, make sure it remains along the curve of your head until you reach the other side.
- Braid the hair normally, still adding in hair until you reach the ends.
- Wrap the braid around itself with the ends pinned at the center to create a bun.
14. The Twisted Sister

What You Need
- Hair pins
- Elastic bands
- Comb
Procedure
- Start this updo with damp hair. Comb your hair, spritz some hairspray on it, and using a curler, create waves in your hair. This means that you have to keep your hair in the curler for about 5 seconds and then wait for it to cool. Once it is cool, spray some hairspray on it and leave for about 10 seconds. After this, run your fingers (not a brush or comb) through your hair.
- Divide your hair into two halves – a top half and a bottom half. Clip the top half. Wrap the lower half into a low messy bun.
- Unclip the top half and divide it four sections of hair, leaving the front section clipped. Take one of the four sections, twist it, and pin it over the messy bun. Repeat the same for all the other sections, pinning each section alternately above the other.
- Take the front section of hair and tease it to create a pouf. Twist the ends of the pouf and pin them neatly within the twists.
15. The Complicated Twisted Sister

What You Need
- Hair pins
- Elastic bands
- Comb
Procedure
- Detangle your hair using a brush. Take some hair from the sides and tie a half ponytail.
- Flip your ponytail by passing it through itself just above the elastic band. This creates twists at the top.
- Take some hair from the sides and tie another half ponytail just below the first half ponytail. Flip this ponytail as well.
- Take the rest of your hair (including the remaining hair from both the half ponytails) and tie it into a low ponytail near the nape of your neck. While tying the ponytail, don’t allow all the hair to pass through. This will form a small bun with loose ends.
- Take the ends and wrap them around the bun neatly, pinning them in place.
16. The Twist-In Bun
What You Need
- Hair pins
- Elastic bands
- Comb
Procedure
- Divide your hair into three sections – two side sections and a large middle section. Tie the middle section in a ponytail.
- Flip the ponytail within itself.
- Take the side parts and tie them into a ponytail.
- Tuck that ponytail into the first ponytail, allowing the hair to fall loose and merge with the hair from the first ponytail.
- Tie the rest of your hair at the end.
- Flip over the hair and pin it up underneath the first flip.
- Using pins, adjust any loose strands and the bun itself to set it in place.
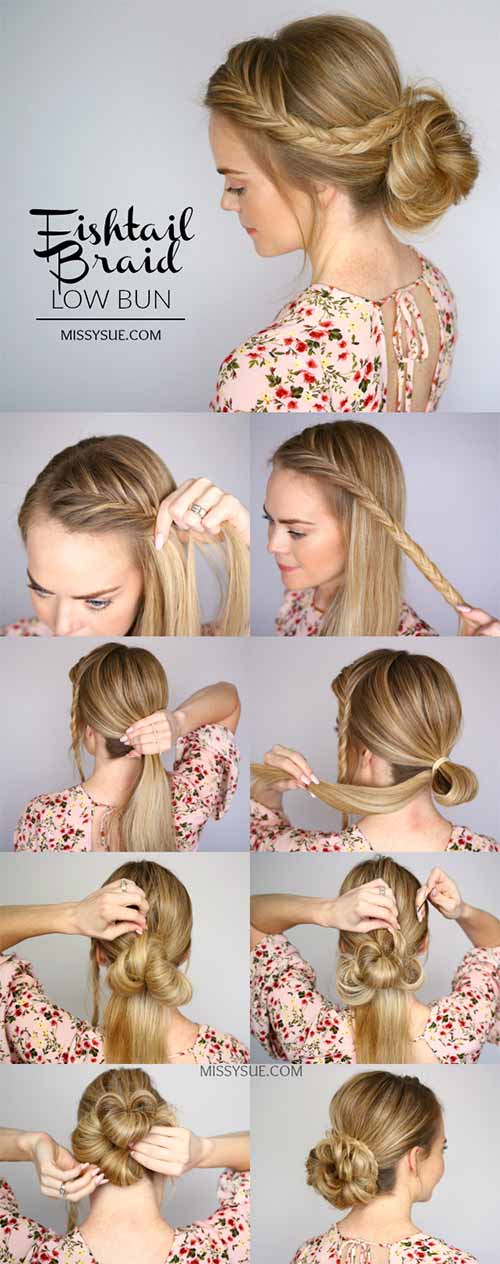
17. The Fishtail Braid Low Bun
What You Need
- Hair pins
- Elastic bands
- Comb
Procedure
- Detangle your hair and part it on one side.
- Take a section of hair from one side and fishtail braid it till the end. For a fishtail braid, divide the section into two halves. Alternately, pick up some hair from the corners of the halves and switch them so that the corner piece from one braid reaches the inner side of the other section. Tie the ends with an elastic band.
- Leaving out the fishtail braid, take the rest of your hair in a low ponytail.
- Using an elastic band, tie a low ponytail. While tying the elastic band at the end, don’t let the hair pass through completely. This step creates a small bun while the rest of your hair hangs loose.
- Take a small section of hair from the hair that is hanging loose and fold it loosely over the bun. Use a pin to hold it in place. Do the same for the rest of hair as well.
- You can fold the hair into a bun. Or you can use the sections of hair to create elaborate and intricate designs.
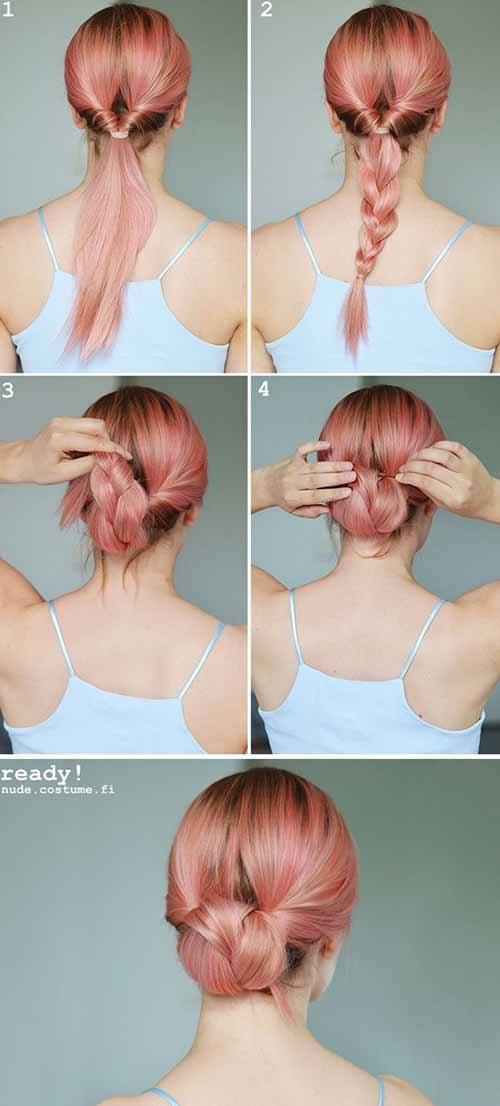
18. The Simple Braid Bun
What You Need
- Hair pins
- Elastic bands
- Comb
Procedure
- Tie your hair in a low ponytail and topsy-tail it twice.
- Braid the rest of your hair and tie it at the end. If you want to get creative, you can try other braid patterns out.
- Pancake the braid to make it look loose.
- Fold the braid up, tucking the ends within the elastic band of the first ponytail, and pin it in place.
- Arrange the braid and pin it up so that it looks like a three-part bun.
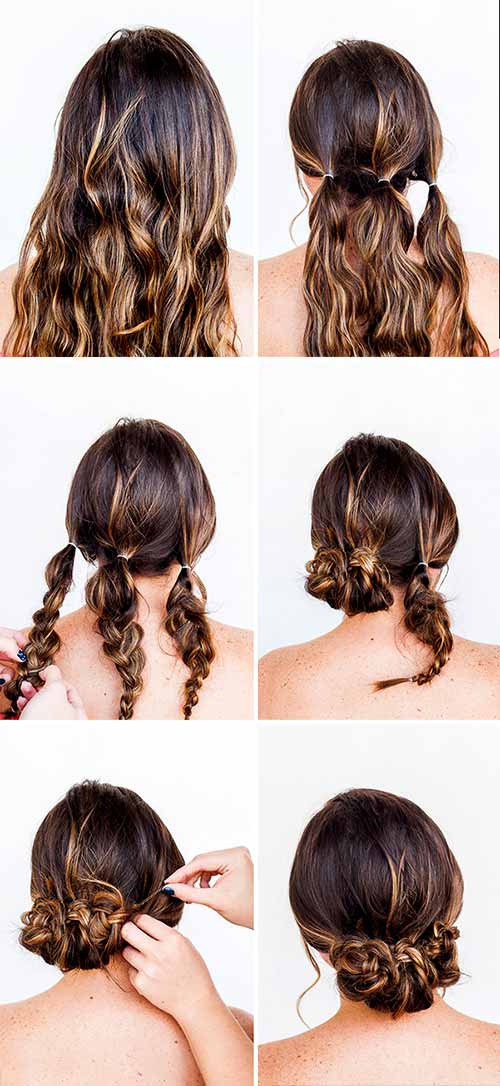
19. The Valentine Special
What You Need
- Hair pins
- Elastic bands
- Comb
Procedure
- This hairstyle requires textured hair for it to look amazing. So, either curl your hair or try this hairstyle on unwashed hair.
- Divide your hair into three sections and tie them in three low ponytails.
- Braid each ponytail until the end, securing them with elastic bands.
- Pancake the braids.
- Fold the first braid within the ponytail’s elastic band. Repeat the same with the other two braids. This forms three braided buns.
- Using pins, join the three braided buns together. Allow strands to fall free as this will add to the style of the updo.
20. The Messy Fishtail Braided Bun

What You Need
- Hair pins
- Elastic bands
- Comb
- Curling iron
- Hairspray
Procedure
- Curl your hair and spritz on some hairspray to keep it in place.
- Braid your entire hair into a side fishtail braid. For a fishtail braid, divide the hair into two sections. Alternately pick some hair from the corners of the sections and switch them so that the corner piece from one section reaches the inner part of the other section. Secure the ends with an elastic band. Tie the braid a little loose.
- Pancake the entire braid by tugging at each stitch of the braid to make it look wider.
- You can wrap the braid around itself on the side, just below the ear. Pin it to hold it in place.
These quick updos look elegant and are oh-so-easy to do. However, you do need to take some measures to ensure that they last throughout the day. So, here are a few tips to maintain your updo.
How To Maintain An Updo
- Make sure you pin your hair tight. Use pins that are the same color as your hair. For some updos, you’ll need a lot of pins, and it looks better if they’re all the same color as your hair. A key to holding pins and clips in place is to criss-cross them. This keeps them tightly intact.
- This is a law to live by! Hairspray will keep your updo in place for hours. If you feel like your updo is losing its hold, carry a travel-size hairspray in your bag.
- Spray hairspray onto a large powder brush and then brush it onto the sides and top of your hair. This will banish any frizz and give you a flyaway-free, sleek style.
- Bobby pins are the magical unicorns that keep your hair in place. But misting them with hairspray can help them get a more secure grip on your hair.
- Good texture means more hold, which is why hair stylists always request to work with hair that hasn’t been freshly shampooed as it is very slippery. If you’ve got squeaky-clean strands, you can quickly add some grip with a texturizing product (sea salt spray works wonders) to make your hair more pliable and easier to work with.
So, what are you waiting for, ladies? Which updo has tickled your fancies? Try it out and comment below to let us know how it went!
Source: stylecraze