 We are sharing information for knowledge. Presented by. SocialDiary.Net

Despite this universal knowledge, pooping as a topic is so very taboo (for some inane reason) that we just don’t broach it. In today’s culture, it’s easier at times to talk about sex than poop, which (in my humble opinion) speaks volumes about our dysfunctional perspectives.
It is also why most of us are rather clueless of what falls in the realms of normal, abnormal, and I-need-a-doctor-like-now, when it comes to bowel movements.
And this is absolutely tragic. Poop is a health indicator. The quality of your feces is your body’s way of signaling whether everything is running smoothly in there or you need to be on alert. This is the reason why questions related to your bowel movement are a staple in every doctor’s general medical history.
Hence, it’s time to start paying attention.
It’s time to hear just what your body wants to say.
What Is ‘Normal’ Poop Anyway?
About 75% of your stool is water while the rest is a combination fiber, cells, living and dead bacteria, and mucus. A regular bowel movement could be considered as anything between passing stools a maximum of 1-3 times a day to a minimum of thrice a week (1).
When it comes to interpreting stools, always think of the four Ss: shape, size, smell, and shade. Healthy stools should have the following characteristics:
- Shade: Light to medium brown.
- Shape: S-shaped.
Fun fact: The shape actually comes from your lower intestines. It should ideally be soft and smooth, arriving in one long portion and not in a bunch of smaller pieces. It should also have a uniform texture and sink slowly, i.e., it shouldn’t float or splash!
- Size: Roughly 1 to 2 inches in diameter and around 18 inches in length.
- Smell: Now, I’m not here to tell you it should smell good. However, it should smell natural and not too repulsive.
What The Color Is Telling You
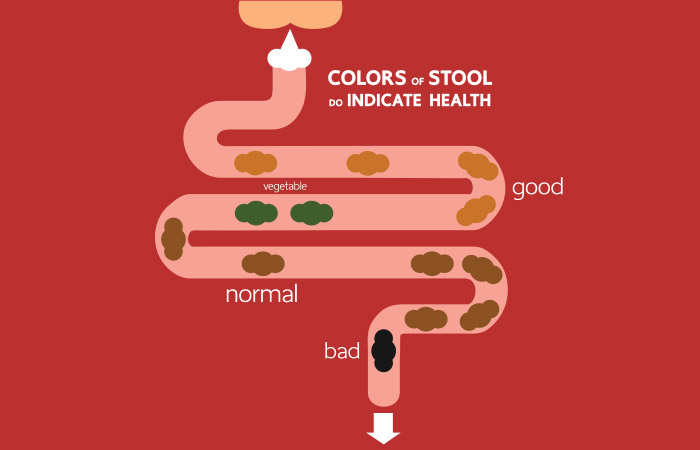
Before you ask, yes, poop does come in different shades. And most of the times, the color can provide great insight into what your body is up to.
- Medium To Light Brown: Congratulations! You’re perfectly normal.
- Black Or Bright Red: This could indicate a possible bleeding in your gastrointestinal tract.
Bright red stools indicate fresh blood, which could mean lower GI tract bleeding.
Black stools could also appear as a result of certain supplements and medications or consuming black licorice. If your stools are black, tar-colored, please go and get evaluated by your doctor.
- Green: This is a surprisingly common stool color change to occur. It could be due to the presence of bile pigment in your stools when you’re suffering from diarrhea. Loose motions cause food to travel quickly through your intestine, which doesn’t give your body enough time to break down the green bile pigment into its normal brown color (2).
The green color could also be as a result of consuming green foods like leafy green vegetables or even green food coloring.
- Yellow: Could indicate a gallbladder problem, a giardia infection or a condition referred to as Gilbert’s syndrome (3). If you see this color, please consult a doctor.
- White Or Gray: This could indicate a lack of bile, which may suggest a very serious problem, such as cirrhosis, pancreatic disorders, hepatitis, or even a blocked bile duct. Hence, please consult a doctor a.s.a.p (4).
The use of antacids could also produce white stools.
If there is increased mucus in your stools, it could be related to inflammatory bowel diseases like ulcerative colitis or Crohn’s disease, or it could also be a sign of colon cancer (5, 6).
What The Shape Is Telling You
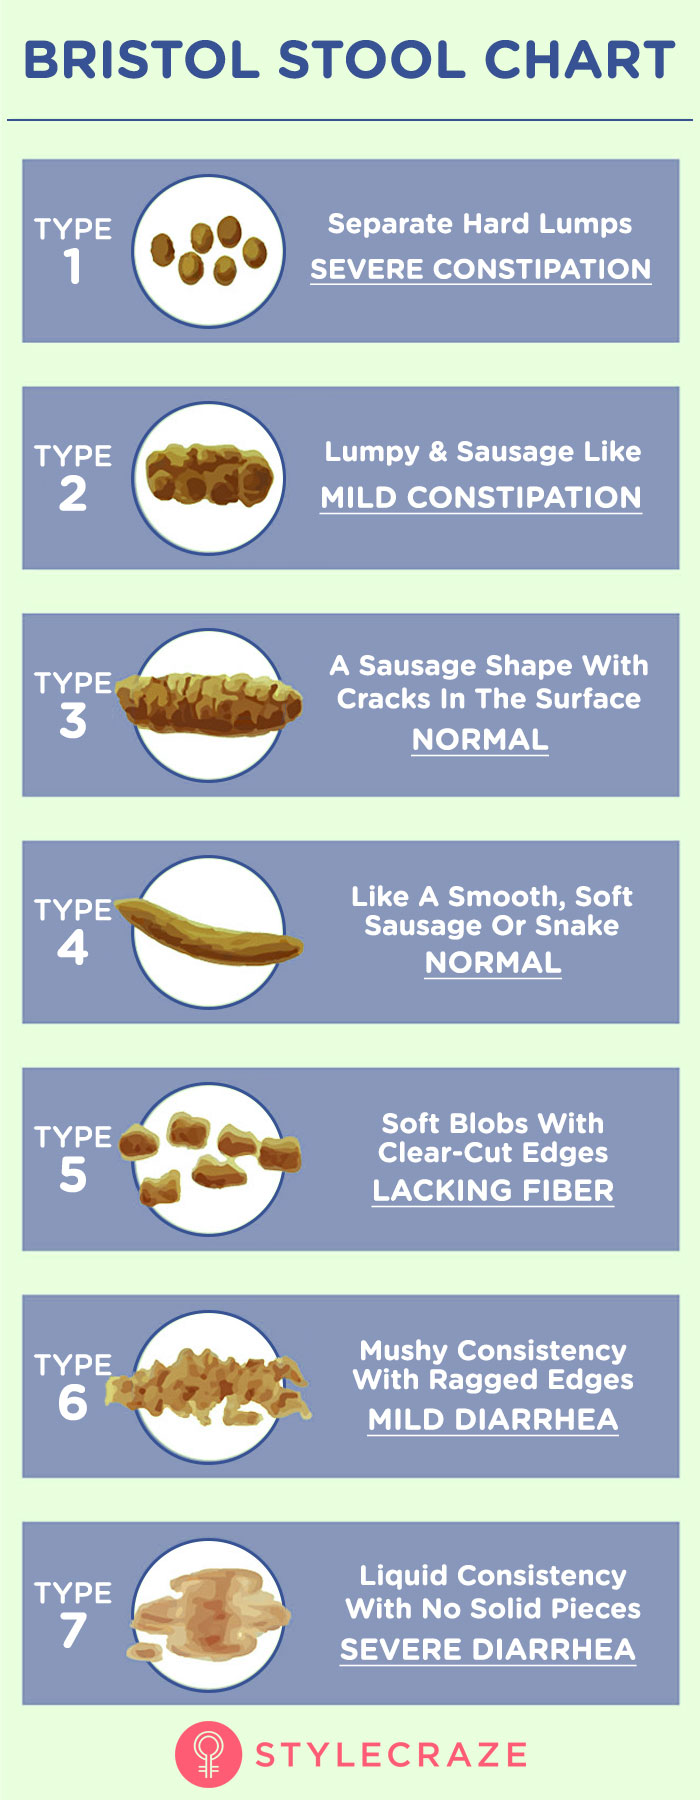
- Little Lumps Like Nuts That Are Hard To Pass: This indicates that your food has been in the intestines for too long, which is causing the water in your stool to be reabsorbed. It is a lack of fiber in your diet that is causing these pellet-like, hard little lumps to be formed.
- Too Liquid: It is moving through your intestines too quickly, hence, water isn’t being absorbed. This could be as a result of a high fiber diet, a recent cleanse or even an infection (7).
- Pencil Thin: If your stools appear like thin ribbons, it could indicate a possible mass in your colon that is constricting the stool. It could be a possible indicator of colon polyps or cancer.
- Floats And Stinks: This indicates that your body isn’t properly absorbing fats. It could be as a result of a malabsorption disorder, weight loss drugs, or even Olestra (read: calorie-free substitute for fat).
- Sausage-Shaped But Hard And Dry: It’s staying inside your intestines for too long, causing water to be reabsorbed. It could be due to constipation, dehydration or even medications.
- Non-Existent: If you aren’t passing any stool, you’re most likely constipated. Please drink water and try increasing your dietary fiber intake.
Poop isn’t just a fact of life, it’s also your body’s form of communication. Stop ignoring what your body has to say. It’s time to listen.
Source: stylecraze